The purpose of this project was to build a low cost generator for charging
12 volt lead acid batteries. My goal was a design requiring no welding.
This should simplify construction for an at home project. The entire generator
was built using second hand parts with the exception of the engine pulley and
drive belt. Scrounging parts is half the fun for me and cuts cost. My dimensions
are based on the parts I could find and slight variations should not matter,
My engine came from a flea market lawn mower purchased for $20.00. It is a 3 H.P.
vertical shaft Briggs Stratton engine. Crankshaft dimension are 7/8 in. diameter
by 2 7/8 in. long. This size engine works well, but I would not recommend an
engine with less horsepower.
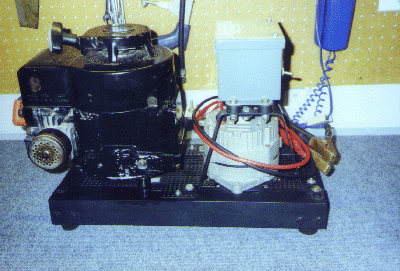
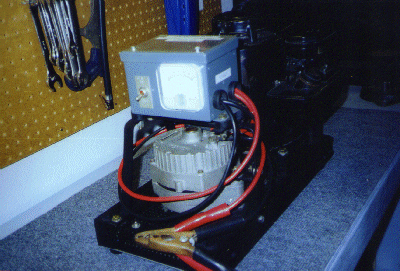
I chose an automotive alternator with a built in voltage regulator. This
simplifies construction because less parts are required and wiring is
simpler. I was lucky to acquire a 60 amp. version just for the asking.
Many alternators of this type were also made in 45 amp. versions
which will work fine. I strongly suggest installing an off/on toggle
switch in the wire going to the internal voltage regulator. This makes
for easy engine warm up. Once the engine is running and the battery
connected I set the throttle to about 3/4 th and turn the regulator on.
The engine will load and charging starts.
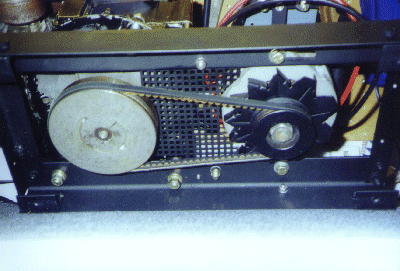
The sides of the frame are made from 2" by 2" angle iron. Each side
being 19" long. The ends are 1 1/4" by 1 1/4" angle iron 8 1/2" long.
The end pieces are bolted to the inside of the side rails. Outer
dimensions of the frame when assembled are 19" by 9 1/2". The
frame can be welded if preferred.
My alternator rest against the frame without any spacers. One end
of the alternator is bolted to the frame with a 3/8" bolt. I drilled a
series of 5/16" holes and then used a die grinder to cut between the
holes. This resulted in a nice slot to allow alternator movement for
belt adjustment. I was lucky enough to have an alternator with a
double grove pulley. This gave me more options on figuring out belt
alignment.
For proper charging the ratio between alternator versus engine speed
should be about 2 to 1. This meaning that the alternator should turn
about twice as fast as the engine. I use a 5" pulley on the engine and
a 3" pulley on the alternator not quite 2 to 1, but it works great.
Slight variations are acceptable.
To obtain proper belt alignment with my alt,-eng. combination, I had
to space the engine up 1 1/2". If my engine had a shorter shaft length,
the spacer length would also have been shorter. The spacers are made
from 1/2" water pipe. I also had to use two 1 1/4" by 2" pieces of angle
iron as extensions because the belt pattern of the engine was smaller than
the inside opening of the frame. To easily understand this arrangement,
please see pictures. My combination uses a 37" drive belt.

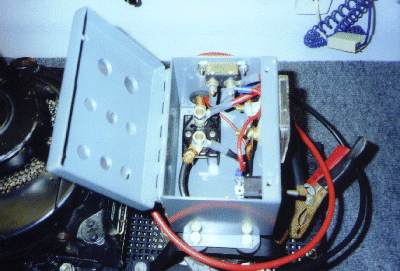
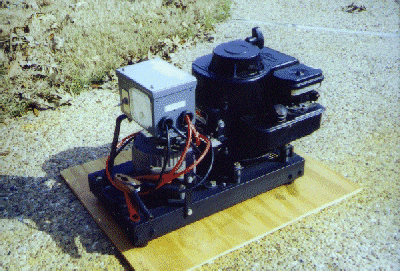
The control box is a junk box item that houses a circuit breaker, an amp.
meter, on/off switch for voltage regulator and terminal posts for battery
cables. The circuit breaker is a resettable 50 amp stud type. Battery cables
are #4 gauge with clamps for battery. I used a 130 amp. gauge simply
because that is what I had on hand. Be sure your amp. gauge will handle
the output of your alternator. The control box is mounted on four rubber
mounts that rest on a bracket made from 1/8" by 1/2". Flat iron. All parts
in my control box came from either my junk box or someone else's junk
box. Remember scrounging can be fun!
I had safety concerns with fingers or other objects getting in the belt during
operation. I fastened four angle brackets to the inside of the side rails
and fastened a piece of aluminum to those to cover the bottom. This prevents dirt,
grass,ect. From getting in the belts and pulleys. I then carefully cut and fit belt
guards for the top of the generator. The decorative material I used was cut out of
paper trays sold at office supply stories. This made a nice looking screen and is
about .04" thick. Fabricate your guards carefully to prevent accidental injury.
The generator works really well with little vibration. When I charge a battery
the amp. gauge shows about 40 amps. and slowly works it way down to zero.
When you get close to zero the battery is charged. Please keep in mind this
generator is designed for automotive type batteries. The charge rate may be too
fast for some types of batteries. I would not suggest operating electronic
equipment from a battery while it is being charged without some type of
protection device.
Please be mindful the engine and alternator will get hot during operation.
Always allow the engine to cool before refueling.
Total cost for my project was an amazing $60.00. It took about 40 hours
to construct spread over three months. It is difficult to explain every
procedure of construction, so please see pictures to get any ideas you may
need.
This project is intended for educational purposes only. If you build
something like this generator, you must build it at your own risk!
YOU must determine the merits of this plan for yourself and assume
all the risks associated with its construction and use. No guarantees
are expressed or implied as to the accuracy of information presented
here! Consult with an automotive wiring expert before attempting to
carry out any wiring.
|
 - The KC5LDO Field Day Generator -

