 - The KC5LDO SPC Tuner -
 |
|
|
|
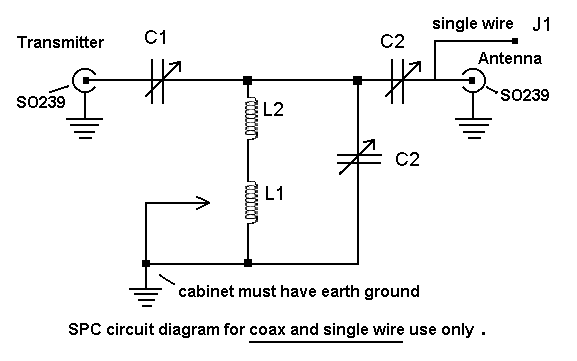 |
When building a SPC tuner, one of the hardest things is physically mounting the capacitors. Both ends of the capacitor are hot, so they must be mounted on glass or ceramic insulators. The shafts to the capacitors must also be insulated with ceramic insulated shaft couplers. This keeps the RF out of the knobs and you.
The L1 coil can be made according to specs in the parts list, or, a roller inductor may be used. I chose a tapped coil because it was cheap and switching between tap points is quick. The specs for the L2 coil are also in the parts list and require a little experimentation. L2 must be mounted at a right angle to L1. Of course, both coils should be mounted on ceramic insulators. If you have surplus coils in the junk box you can use the following formula to figure out their inductance. You can also use a different diameter coil than I used.
Use the formula to figure out the number of turns required if doing so.
Since RF likes a lot of surface area, I chose to use tinned copper braid for all wiring. I used 1/8 inch wide braid for the coil taps mainly because I already had it and anything wider would not fit between the coil turns. You should pick a day when you have a steady hand for soldering the coil taps. It is very touchy work and requires patience. At least in my case! hi hi I used RG213 for the leads to the SO239 connectors. This may be overkill. I am sure RG8X would be just fine.
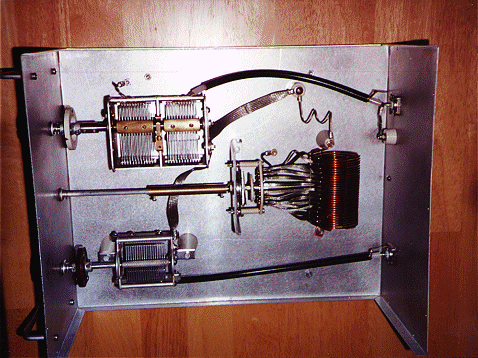
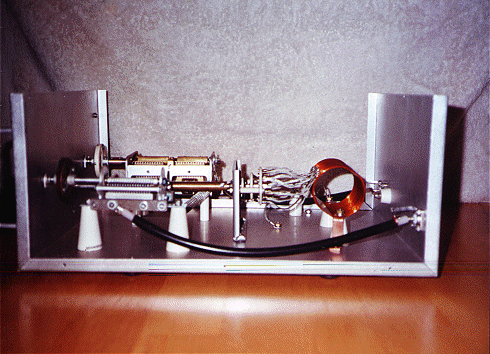
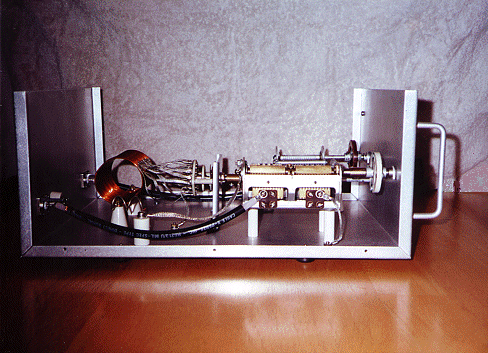
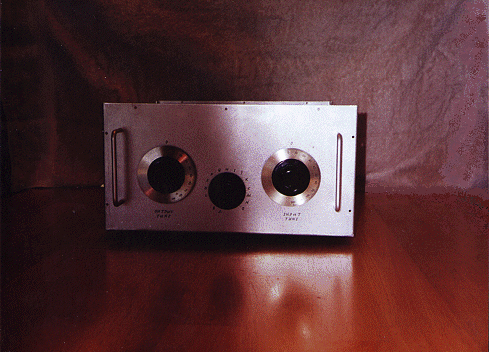
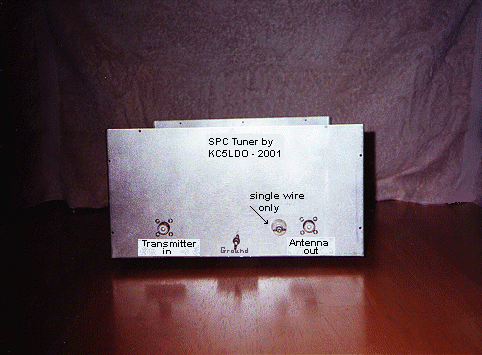
Looking at the pictures of my project will pretty much show how I did everything else. Keep in mind my tuner can only be used with coax feed or a single wire. For tuned feeders, a balun would have to be added. I did not research this as I did not intend on using tuned feeders.
|
|
|
|
|
|
|
|
|
|
|
|
|
|
|
Now, for the results; When I first used the tuner on 160m. I realized a mistake I had made. I should have installed vernier dial drives. Tuning is very sharp and you must dial slowly if you do not have them. Large knobs helped the situation. The tuner worked great and gave me a match with a SWR of 1.75 to 1 with 125 watts on 1850 kHz. The coil did get rather warm though. However, the coil barely gets warm with power cut back to 75 watts. Eighty meters is another story. The tuner will bring the SWR down to acceptable levels, but the coil gets very, very warm. My antenna really does not like the 80M band. While I study the situation, I will stay off 80 meters for now.
After modifying L2 to the specs as shown in the parts list, the rest of the bands are very easy to tune. I have not tried it on a single wire as of this time.
Needless to say, I am very pleased with my tuner project. As an after thought, I might add a bypass switch. It took about 80 hours total, but this includes hunting parts, making coils and a lot of thinking.
C1 - approximately 200pf. air variable single gang capacitor.
Mine has 18 plates with .040 inch spacing.
C2 - dual gang air variable capacitor with approximately 200pf. per section.
Mine has 12 plates per section, also with .040 inch spacing.
SO239 - two needed, my preference is silver plated with Teflon insulators.
Do not be cheap here.
L1 - Coil should have an inductance of between 25uh. and 28uh. for 10 - 160
meter use.
I made my own air wound coil. I used 14 gauge enamel covered
copper wire bought from a shop that rebuilds electric motors. The coil is 30 turns,
2-1/2 inches in diameter and 3-1/2 inches long. Tap the coil every 2 turns.
L2 - This coil is used for the high bands. It will affect 10 and 12 meters the most. Due to parts layout and stray capacitance from wiring, it is hard to say that one size coil here will work for everyone. After making four coils, the one that worked for me is made from 12 gauge tinned copper wire 5/8 inch diameter, two turns spaced to 1-1/2 inch long. You may have to add a turn or increase the inner diameter. Do this if the SWR will not come down low enough on 10, 12 or 15 meters.
J1 - a ceramic feed through bushing for single wire use.
2- insulated ceramic shaft couplings
1 - ceramic rotary switch, preferably with silver contacts.
I needed 15 contacts for my tuner.
Misc.- 1/4 inch shaft and coupler for rotary switch, knobs, a cabinet with four rubber feet and necessary screws, washers and nuts.
Happy tuner building, good luck and 73,
James Tobola - KC5LDO


